
I’ve been building computers for many years now and my latest gaming PC I built around two years ago now. During those two years I’ve made some improvements, new video card, add another SSD to run raid0 and all that has been fun. But now I’ve run out of “normal” things to do with it so I was getting a bit bored. So I was looking for a new challenge and I happen to follow a lot of PC-hardware related channels on Youtube (Linus Tech Tips, Gamers Nexus) which happen to do some delidding and I thought, how hard can it be!
What is delidding and why?
In short, you take the lid of your CPU. More specifically the lid is the silver colored metal (nickel) that sits on top of the often green PCB as seen in the picture below.

That silver colored metal part is what is called the IHS which stands for integrated heat spreader. It makes contact with the actual CPU which is underneath it and then spreads the heat the CPU is generating to a larger surface area. Which a heat sink then can make contact with and dissipate the heat to the surrounding air. Delidding just means removing the IHS from the PCB/CPU.
Why you would do this is so that you can remove the material that is in between the actual CPU die and the IHS, the material responsible for transferring heat between the CPU and the IHS, and replace it with something better. This material is called thermal interface material or TIM for short.
Lets get into how you actually do it and I will explain more a long the way.
Before proceeding you need to know the following:
- This will void your warranty.
- Do not use liquid metal together with aluminum. Only use it with copper or nickel plated copper.
The shopping list
For this project you will need to buy the following items:
- Thermal Grizzly Conductonaut
- Thermal Grizzly Kryonaut
- Thermal Grizzyly cotton swabs
- Der8auer Delid Die Mate 2
- Rockit Cool copper IHS for Intel 1151
Testing
Even if you don’t want to write an article like this I recommend you do before and after thermal tests. Since you can get this wrong it’s important to know if your delid actually worked. What I used for my testing is the Aida64 CPU and FPU stress test, I ran them at the same time for 30 min. I used HWMonitor Pro to record the temperature. It’s also important to note what the room temperature was when you ran the test so that changes in ambient temperature doesn’t affect the result.
So do a stress test of your CPU before doing any changes and then do the same test when your delid is finished and compare the results.
Practice makes perfect
If you like me never had delidded a CPU before doing this project I would recommend you find a practice CPU that is okay to destroy in the process. You don’t want to do this with the CPU from your only gaming machine straight away and end up destroying it because your warranty won’t cover it!
Luckily I had an old Pentium 4 laying around that was of no use that I could practice on. If you don’t have a CPU laying around I would recommend you go on Ebay and buy something really cheap. Just make sure the CPU you buy uses TIM and doesn’t have the IHS soldered to the CPU. If you try to delid a soldered CPU you will most likely destroy it.
For modern Intel CPU:s there are special delidding tools, like the one from Der8auer that is on the shopping list earlier in the article, there isn’t one I know of for a Pentium 4 though. So for this practice run I had to go with a more primitive solution, a vise!

Important note here. Notice how the CPU on the right side touches the vise with the PCB and on the left side it touches with the IHS. When you then apply pressure that means the vise will push the PCB in one direction and the IHS in the other and eventually that will cause the two to separate.
How much pressure you need to apply will vary, I needed to apply a lot of pressure. Right before it separated I actually had a hard time to turn the vise. I would also recommend putting some sort of plastic bag around the vise and the CPU while you do this so that they CPU doesn’t fly away when it separates. But even though I had to apply a lot of force I was successful!
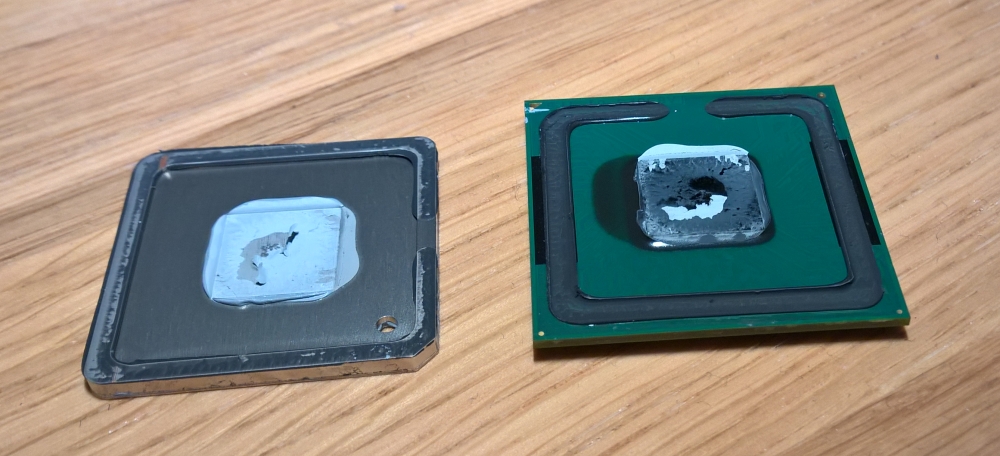
What you see here is the IHS on the left with the grey thermal interface material in the middle and silicon adhesive around the edges (the black material). The adhesive is just there to keep the two parts together and is what puts up so much resistance when you try to delid it. You now need to clean of the TIM and scrape of most of the adhesive.

I didn’t do a very good job of scraping off the adhesive this time but I will fix that when I do it on a CPU I am actually going to use.
Now it’s time to apply the liquid metal instead of the old TIM to improve the heat transfer between the CPU and the IHS. This is Conductonaut from Thermal Grizzyly which is on the shopping list earlier in the article.

My first attempt at applying liquid metal wasn’t very good, as you can see in the image above. On the CPU die I have small puddles of liquid metal. You should not have puddles, there should be enough liquid metal to cover the die but no more than that. You also need to apply it to the IHS where the CPU die makes contact.
When you have applied the liquid metal you can put the IHS back on the CPU. If you are doing a proper relid you will put on some new silicon adhesive also but I won’t be doing that, more on that later.
Since I have no motherboard for this CPU I won’t be able to test if the delid had any effect. But that wasn’t the point of this, the point was just to practice taking of the IHS and applying liquid metal. Applying liquid metal can be tricky and you can kill components if you get it in the wrong places since it conducts electricity. So practice applying it before doing it for real so you know how it behaves.
Delidding the Intel 6700K
Now it’s time to move on to a CPU which I am actually going to use. This is not the CPU I use in my main gaming rig but a CPU I plan on using in an upcoming FreeNAS build (will try to write up something about that as well). But the point is, I do not want to break this CPU, it will get expensive if I do.
For this delid I won’t be using a vise, thankfully, I will instead be using the Der8auer Delid Die Mate 2. It’s a really easy tool to use and very effective, it’s a bit pricey but I think it’s worth it when you consider the cost of the CPU. To use it you place the CPU in the delid tool with the arrow on the CPU pointing in the same direction as the arrow on the delid tool as shown in the picture below.

Then slide in the small lid of the delid tool and screw in the screw using your fingers as much as you can, like shown below.

Start then to turn the screw using the included Allen wrench. This will put sideways pressure on the IHS and will eventually cause it to separate from the CPU. Be careful, increase the pressure gradually and watch the distance between the edge of the PCB and the IHS to see if it decreases. When you see the IHS move, you will also feel the resistance of turning the screw suddenly decreasing, immediately stop turning the Allen wrench.

Unscrew the screw and remove the lid of the delid tool. Now try to remove the IHS just with your fingers, be careful to not damage the surface mounted components on the bottom of the PCB. For me the IHS came off really easy this time but when I delided my 7700K I had to put it back in the delid tool and apply some more pressure before it let go. When it does let go you should see something like this.

Use isopropyl alcohol on paper and/or cotton swabs to clean off the grey TIM. If you are planning on putting back the stock IHS you will need to clean the IHS as well. I’m not planning on doing that so I won’t be cleaning it, I will instead use a new fully copper IHS from Rockit Cool.
You will also need to scrape of the silicon adhesive from the CPU. You won’t be able to get rid of it completely without risking damaging the CPU but that is not necessary. I would say it’s enough to just get rid of the high edges that outlines the adhesive and just in general flatten it and make the layer of adhesive thinner. You do that to decrease the distance between the CPU and the IHS. A bigger distance means you need more TIM between the IHS and the CPU and more TIM is not good for transferring heat efficiently. So by decreasing the distance you get better thermal performance.
That is also why I won’t be adding back any silicon adhesive, I will leave the CPU delidded and just drop the new IHS on to the CPU. That makes the CPU harder to move around but I’m not planning on removing it from my motherboard after doing this so that won’t be a problem. If you are planning on leaving your CPU in your motherboard I would recommend this approach, it can improve your thermal performance in a pretty significant way to not apply any silicon adhesive.
To clean of the silicon adhesive I would recommend some sort of plastic spudger, I’m using this one from my iFixit toolkit.

When you are done cleaning your CPU should look something like this.

You are now ready to apply liquid metal to the CPU die. Remember that you need way less liquid metal than you think you do. It’s way easier to show you how you should apply the liquid metal in the right amount so I will let someone called Buildzoid do that for me:
He uses normal cotton swabs but I would recommend using the Thermal Grizzly ones. They seem to hold together a bit better and leave less cotton in the metal which you don’t want.
When you have spread the liquid metal and you have made sure you don’t have any pools of liquid metal you can put the CPU back in the socket. If you do have pools you can use another cotton swab to get rid of some or if the pools are large you can suck some back using the syringe.

You now also need to put some liquid metal on the part of the IHS where the CPU makes contact with it. It can be hard to know exactly where that is but in this case it’s not that big of a deal if you cover a larger area than what is needed. As you can see in the image above we have quite a lot of space where there are no surface mounted components that we are at risk of shorting out, they are mounted on the other side of the CPU instead. So this is how my IHS looked after applying the liquid metal.

Not the prettiest but it was quite hard to work with the liquid metal on this surface.
I should talk a little bit more about why I’m not using the stock IHS. The IHS above is from a company called Rockit Cool and it’s just a solid copper block made to replace the stock IHS on Intel 1151 socket CPU:s. The stock IHS is also a copper block but it’s nickel plated. But that is not the reason for choosing the Rockit Cool IHS. The reason is that it has a larger surface area so your heat sink have a larger area of contact which makes it better at transferring heat. When Gamers Nexus tested it they concluded it lowered the temperature compared to the stock IHS by around 3-5C. Nothing huge but if you are going to delid anyway why not go all the way and use this, and I think it looks better than the stock IHS!
When you have applied liquid metal to your new IHS you can drop the IHS onto the CPU. The cutout on each side of the IHS has an offset that is smaller from the top than it is from the bottom. The IHS should be pointing in the direction so that the smaller offset is pointing up, as it is in the picture below. You can slide around the IHS a bit after you have put it down to adjust the position. When you are done you can put the retention bracket back, this will hold the IHS in place even if we didn’t put any silicon adhesive on.
Congratulations, you have now completed the delid process!
But before it’s time to test you need to put the heat sink back on. You could put liquid metal between the IHS and the heat sink as well but I didn’t do that. Firstly you need to make sure that the part of your heat sink that makes contact with the IHS is copper or nickel plated copper, if it’s aluminum and you use liquid metal bad things will happen, bad things like this.
And second it’s much easier by mistake to get liquid metal on your motherboard if you use it on top of the IHS which could kill your motherboard which I wasn’t ready to risk. So I instead used normal thermal paste from Thermal Grizzly, more specifically Kryonaut which is widely regarded as the best thermal paste you can get.
I don’t have a picture of me applying but our friend Der8auer has a great video to show you how it’s done!
Results time
This is the package temperature of the 6700K before delidding. The PC had been running the Aida64 CPU and FPU stress test for about 30 min when this graph starts. The ambient temperature was 22.3C when the test was running.

This is the package temperature after delidding running the same stress test. The ambient temperature was 22.9C when the test was running.

So there is roughly a 20C improvement which I think is very good and well worth the effort. I also delidded my 7700K in my gaming rig and saw about the same improvement.
Don’t forget to now do another stress test to see what kind of temperature improvements you got. If you didn’t get any improvement or, more likely, it’s worse you probably made a mistake in the delid process. Maybe to little liquid metal, the IHS not making contact with the CPU or too much liquid metal. If the result is worse than before you should remove the IHS and investigate.
It’s also important to make sure that all cores have roughly the same temperature. Meaning one core shouldn’t have a high that is 20C higher than the second hottest core. If you do you might have a spot on your CPU without liquid metal which creates a heat spot. Or you might have gotten some dirt in the liquid metal which decreases the thermal performance in the specific spot. If you see results like that take off the IHS again and make sure liquid metal covers the CPU completely and that no dirt has gotten stuck in it.
Liquid metal long term
A lot of people are concerned about how liquid metal performs long term. Some people say you need to remove the old liquid metal and put new on every year to keep your temperatures low.
Some people say the liquid metal will react with the all copper IHS and decrease the thermal performance. I have only seen proof to the contrary and I think the best way this has been demonstrated is by Gamers Nexus in the video below.
If you have any questions, feedback or your own delid story, please leave it in the comments below. Happy delidding!